Template:Basewaypointing
Waypointing in ET
Note that waypointing works only in omnibot mod on your own computer. It does not work in NQ, Jaymod, etc. and it will not work on a dedicated server.
Before you do start to waypoint a map you might what to open a map that has already been waypointed like the any of the 6 standard maps. This will give you an overview of how a waypointed map should look like.
Disable the time limit of the map or set it to something very high if possible. In ET, use the command /ref timelimit 0 to have unlimited time on a map. If a map restarts while you are editing waypoints, your unsaved changes will be lost.
Join a team, Its best to join as an engineer because then you can dynamite obstacles out of your own way, build bridges etc.
Start waypointing
Wait until the warmup finishes, and the map starts.
If you don't want to wait, you can add this to your config:
seta g_warmup "1"
Note: warmup can't be less than 10 seconds in Omni-Bot 0.83 or older.
1st make sure cg_omnibotdrawing is set to "1"
you can do this in console by just typing
/cg_omnibotdrawing
If this is "0" you can either open the console and type
/set cg_omnibotdrawing 1
Or you can add this to your config
seta cg_omnibotdrawing "1"
2nd you need to see the waypoints so open the console and type
/bot waypoint_view on
You can adjust visibility distance
/set omnibot_render_distance 2000
Do not set omnibot_render_distance value too big because game has limit how many lines can be visible concurrently.
Now you can add your 1st waypoint, in console type
/bot waypoint_add
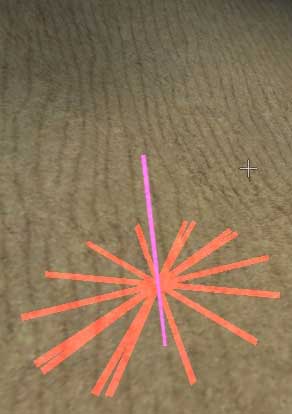
You should now see this
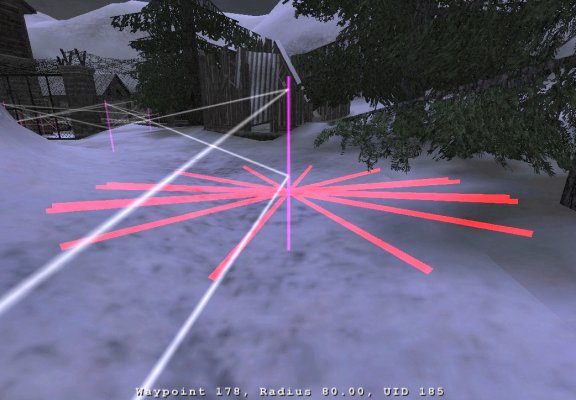
The vertical purple line is the actual waypoint, The red star shaped "beams" indicate the radius size of the waypoint.
Now move away from your 1st waypoint.
Make sure that there are no objects or anything to block your path between your 1st waypoint and where your player is.
Now add your 2nd waypoint
/bot waypoint_add
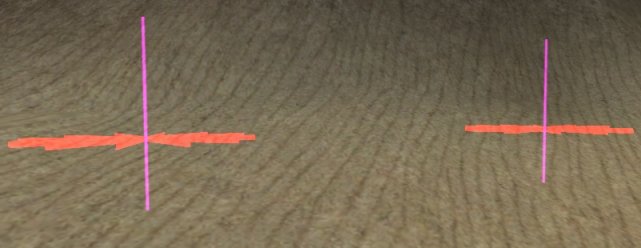
You should now have something like this
The next step is to join the 2 waypoints
There are 2 ways you can join waypoints the 1st is a one-way connection (/bot waypoint_connect) and the 2nd is a two-way connection (/bot waypoint_biconnect).
The general rule is to always use the two-way connection unless it is only possible for the bot to go one-way i.e. when dropping down from a ledge.
Now lets join the 2 waypoints up.
To join up 2 waypoints you need to use the following command on each of the 2 waypoints you want to connect
/bot waypoint_biconnect
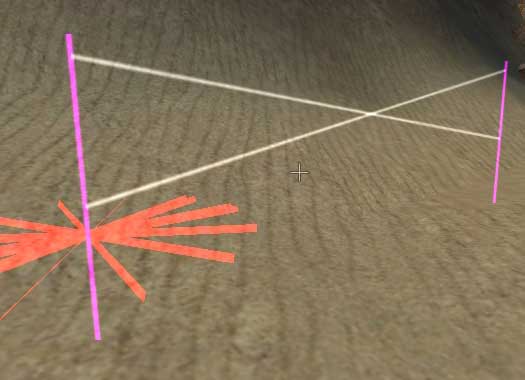
You should now have something like this
Note on this picture that there are 2 lines connecting the waypoints.
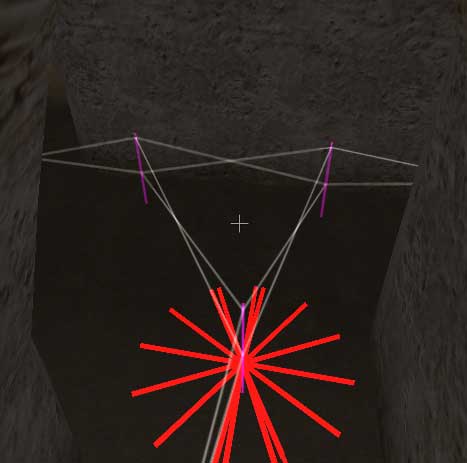
You are not limited to adding 1 connection per waypoint just add a 3rd waypoint and connect the waypoints in the same way you have just learnt.
Now starting from your last waypoint you made move your player to an objective adding more waypoints and connecting them as you go.
Video Tutorial Version
|
Adding & Bi-Connecting Waypoints
|
Saving Your Waypoints
Save often. Although the bot is pretty stable, it is a good habit to save often.
To save you waypoints use this command
/bot waypoint_save
Note If the time runs out on the map you will lose all your work when the maps restarts unless you have used the above command.
Correcting your mistakes
You are 'Human' not a 'Bot' so you will make mistakes.
If you just want to remove the connections between 2 waypoints use the /bot waypoint_biconnect or /bot waypoint_connect (depending on the type of connection) on both the waypoints you want to remove connections from.
To move a waypoint because its in the wrong place you need to go to the waypoint and use this command
/bot waypoint_move
Then move your player to where you want new waypoint to be and use the same command again. Any waypoints you have connected will stay connected this way
In some cases you will want to delete the waypoint & its connections to do that use this command
/bot waypoint_del
Video Tutorial Version
|
Moving & Deleting Waypoints
|
When you are waypointing a map you will sometimes need to change the waypoint radius, The size of the radius is visualized by the red star shaped "beams" at the bottom of the waypoint.
A waypoint's radius is the tolerance for moving towards a waypoint. If you want the bots to get very close to a certain spot, use a smaller radius, if it doesn't matter much if a bot reaches this specific waypoint exactly, you use a large radius.
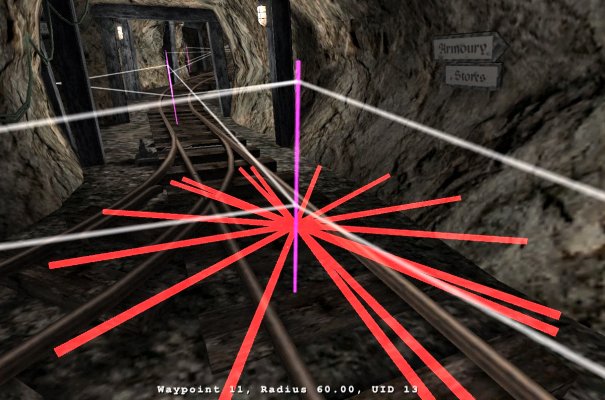
The default radius is 35 game units this will do in most cases, but some situations require some radius tweaking. In areas where there is plenty of space, a larger radius will make it easier for the bots to avoid running into each other when they meet on a waypoint, so a radius of 60, 80, or even 100 will be a better choice:
To Change a single waypoint's radius to 80 for example you would use this command
/bot waypoint_setradius 80
If you want to use a different default size radius other then the standard size of 35, for example 60 you would need use this command
/bot waypoint_setdefaultradius 60
Don't use radius values of less than 10 or so.
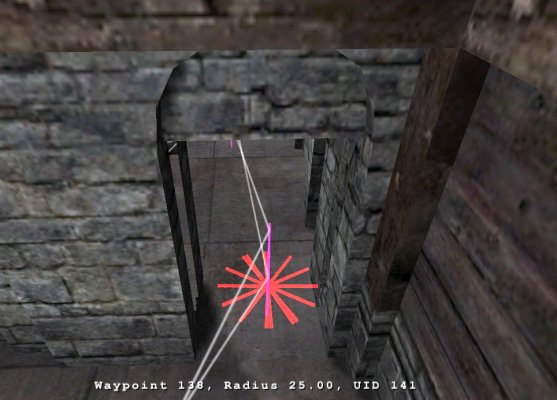
In tight areas, in particular at doors and ladders, use a smaller radius, but normally not much smaller than 20. Make sure that the red "beams" that visualize the radius do not hit walls or other objects:
Movement Flags
This section introduces 'flags'.
A flag is an instruction added to a waypoint telling a bot to do something. You can add more then 1 flag to each waypoint.
The command is:
/bot waypoint_addflag <flag>
There are many flags you can add to waypoints but for now we are just going to look at flags that are relevant to the bots movement.
Jumping
The flag that you are going to use the most is probably the 'jump' flag as bots do not know when they need to jump to get over/onto stairs or a small wall.
There are 3 types for jump flags and you need to decide which one is the best to use for the bot to continue on its way
jump
- This Flag causes the bot to jump.
jumpgap
- This Flag causes the bot to check the ground ahead and jump near before gaps in the ground.
jumplow
- This Flag causes the bot to check a short distance in front of the bot and jump over low obstacles such as small walls, crates, boxes...
Depending on which flag you think best suits the area of the map use one of the following commands:
/bot waypoint_addflag jump
/bot waypoint_addflag jumpgap
/bot waypoint_addflag jumplow
If you find that the jump command you have used does not work very well you can move the waypoint closer/further away or add the same flag command again to remove it, then try one of the other jump flags.
Sprint
The next flag we are going to look at is the 'sprint' flag, this simply makes the bot sprint (run). The sprint flag is a good example of when you can add a 2nd flag to a waypoint, as you know if you jump while sprinting in the game you can just jump a little bit further so you could use both the jump & the sprint flag together. To add the sprint flag you use this command.
/bot waypoint_addflag sprint
Sneak (Walk)
The 'sneak' (walk) flag, this is best used when there is a danger of a bot falling down somewhere if it moves at normal speed, you may also find other instances where this would be useful. To add this flag use.
/bot waypoint_addflag sneak
Prone & Crouch
The 'prone' & 'crouch' flags should be used when it is not possible for a bot to get through an area when in the normal standing position. The commands to add these are.
/bot waypoint_addflag crouch
/bot waypoint_addflag prone
Video Tutorial Version
|
Movement Flags
|
Doors
This section is about doors.
There are 2 types of doors normal (for both teams) & team only.
Normal doors
Approach the door and place a waypoint where you would normally use the activate key to open it.
Now add the following command (flag)
/bot waypoint_flag door
Now you need to do exactly the same on the other side of the door and connect up the 2 waypoints.
Team only doors
Team doors are waypointed in the same way as normal doors and still require the door flag.
Because it is a team only door, another waypoint flag needs to be added.
There are 2 commands to choose from as there are 2 teams in ET axis (team1) & allies (team2).
Depending on which team the door belongs to add 1 of these commands
/bot waypoint_flag axis
/bot waypoint_flag allies
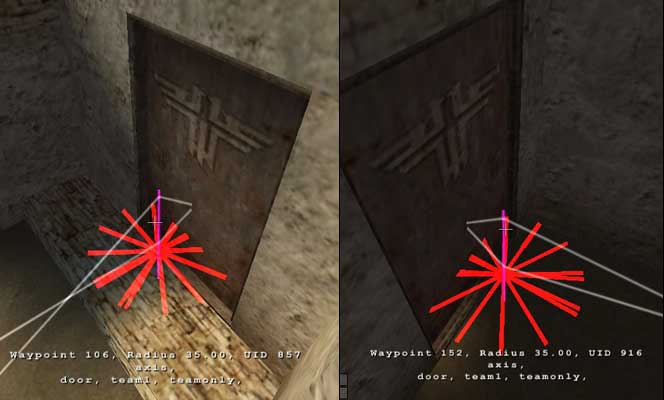
It is sufficient to add axis/allies flag only to that waypoint which is inside building. It should not be added to waypoint which is outside because it can be accessed by players from both teams.
Picture below is an example of a "team only" door
If you want disguised covertops to go through enemy doors, you must add infiltrator flag
/bot waypoint_flag infiltrator
Note: previous Omni-bot versions used disguise flag which required 2 paths through door. The first path had axis/allies flag and the second path had the disguise flag.
Video Tutorial Version
|
Adding & Bi-Connecting Waypoints
|
Ladders
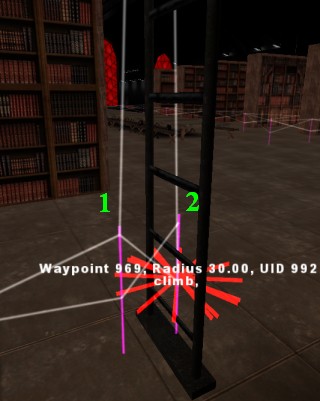
For bots to be able to go up & down ladders you need to use the 'climb' flag.
Short ladders
It's easy to create waypoints for short ladders.
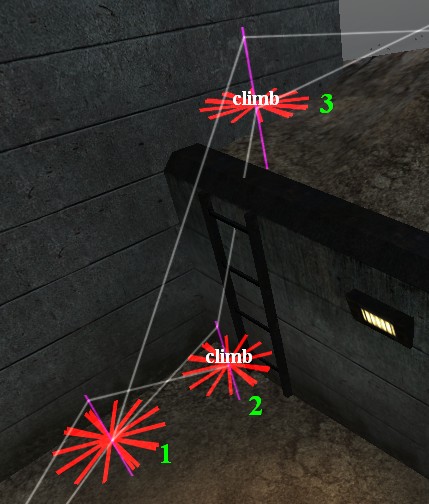
Have a look at this picture for an example
Add two-way connection between waypoints 1 and 2.
Add one-way connection from waypoint 2 to waypoint 3. Bots will use it to climb up.
Add one-way connection from waypoint 3 to waypoint 1. Bots will use it to jump down.
Add "climb" flag to waypoints 2 and 3.
/bot waypoint_addflag climb
Change the radius of waypoints 2 and 3 to match the size of the ladder.
/bot waypoint_setradius 20
Long ladders
It's hard to create waypoints for long ladders because you need to position the waypoints correctly.
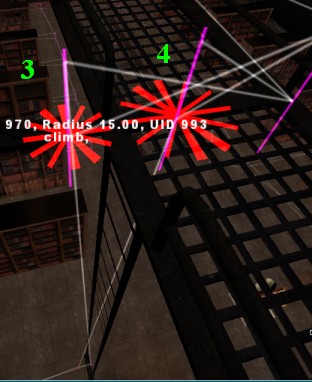
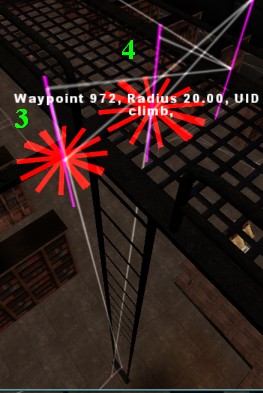
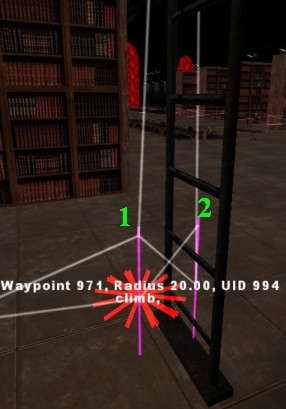
Have a look at these pictures for an example
Waypoint 1 is just before the base of the ladder.
Waypoint 2 is "inside" the ladder. You must have cheats enabled so that you can use /noclip command.
Waypoint 3 is exactly at the top edge. You can use /noclip command and move it slightly away from ladder. But if you move it too far, bot will fall down to death.
Waypoint 4 is at the top just after you have exited off the ladder.
Create one-way connection from waypoint 1 to waypoint 4.
Create one-way connection from waypoint 3 to waypoint 2.
Create two-way connection between waypoints 1 and 2.
Create two-way connection between waypoints 3 and 4.
Add "climb" flag to all four waypoints.
Waypoint 1 should have small radius. Otherwise bots would look up and wait 1 second before they start to climb up.
Waypoint 2 should have bigger radius. Otherwise bots would abort their goal after they climbed down.
Waypoint 3 should have small radius. Otherwise bots would stuck and kill themselves when they want to climb down.
Walls
The old wall in the oasis map is an example of a blockable section that can be unblocked once the wall has been blown.
Because bots do not see walls you need to add a flag that will detect if a bot can use the path between the 2 waypoints.
The flag you need to add is the 'blockwall' flag, this need to be added to both waypoints.
/bot waypoint_addflag blockwall
Once you have added the 2 waypoints you will see a green line if the connection is not blocked & a red line if it is blocked.
If you don't see a red/green line save your waypoints and it should appear
|
Waypointing Walls
|
Vehicles
The 'blockwall' flag is also used for tanks, trucks and any other moveable object in a map.
All waypoint connections which cross the road need to be seen by the bots as blockable or they will just walk into vehicle and become stuck.
You need to place waypoints only at the side of the vehicle. Don't place any waypoints where they would be potentially covered by the vehicle.
Don't place waypoints too close to the vehicle. There should be enough space so that bots would not stuck.
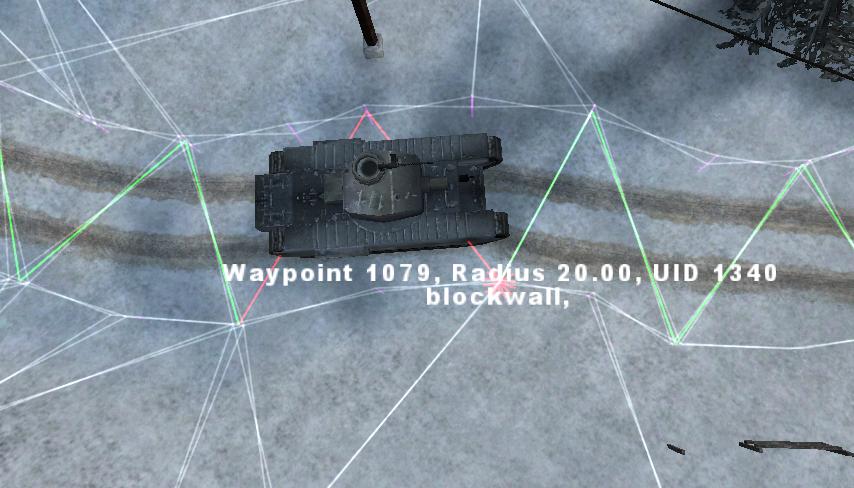
Create paths on at least one side of the vehicle for the entire route. It is recommended to create paths on both sides of the vehicle as shown here:
Usage of the blockwall flag is necessary wherever the tank may cross over any connections. In the picture, the red lines mark the connections currently blocked by the tank.
Try not to create too many blockable connections because it would increase CPU usage. All blockable connections are tested every 2 seconds by TraceLine function that is slow. Connections at both sides of vehicle should not be blockable because they can never be crossed by the vehicle. You can use command /bot waypoint_split to change a blockable connection to two normal connections.
Water
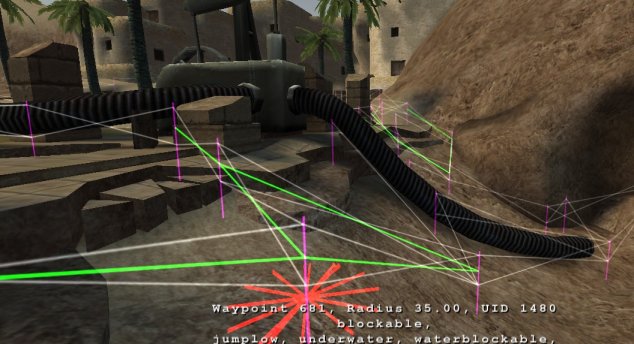
The 2 tunnels in Oasis are a good example where you only want the bots to go though if the water has drained.
You need to use the 'blockwater' flag here.
/bot waypoint_addflag blockwater
You can see in this picture that there are a few green lines this is because there is more then just the 1 entry into the tunnels.
You can also see that in the main part of the tunnel no flags have been added, you only need to add the flags to the entry/exit waypoints.
Bridges
On various maps you need to build bridges to get across a gap. On these bridges you need to add the 'blockbridge ' flag or the bots will try to use the waypoints even when the bridge is not there.
The check for blockbridge is basically a probe to see if there is a surface detected under the link between the waypoints. When there is no bridge built, the probe doesn't detect the surface, and results in a blocked path. When the bridge is built, the surface is detected, and the link is opened.
To add the blockbridge flag use:
/bot waypoint_addflag blockbridge
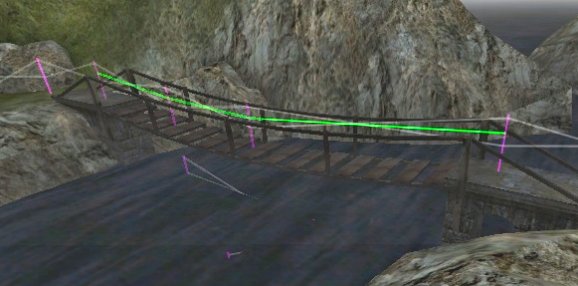
An example of blockbridge (taken from the Bergen map):
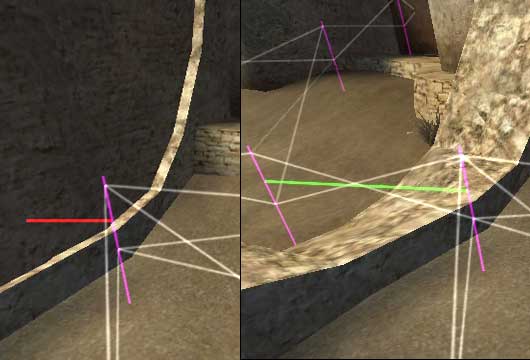
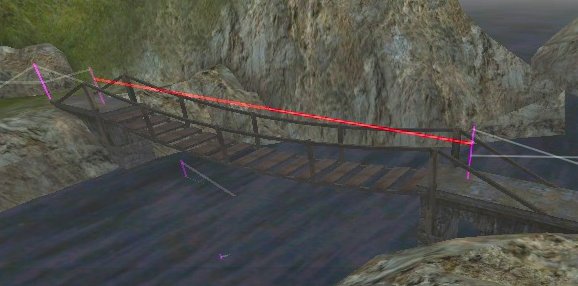
Due to this method of detecting the blocked status of a path across a bridge, rope bridges and similar constructions with a slightly curved shape may require three or more waypoints, all of which should have blockbridge flags. Otherwise, the detection of a surface beneath the path might fail, as can be seen in this screenshot:

