Gameet
Installation (Omni-Bot)
Install ET
You can install original Enemy Territory from Splash Damage or you can install latest version from ET:Legacy.
It is recommended that you have 2 separate ET installations, each in its own folder - one for playing online a the second to run your server with Omni-Bot. Many public servers have custom sounds, textures and menus. They can completely change the game. All these extra pk3 files will be downloaded to the first ET installation and your second installation will remain clean and usable.
Install MODs
Omni-Bot does not work with vanilla etmain. You need some mod. You can use our omnibot mod or you can choose some 3rd party mods. It's possible to have multiple mods installed. In Enemy Territory there are many 3rd party mods that support Omni-bot. Those mods may have extra settings which can be configured, refer to their documentation.
The mods which work with the latest version of Omni-bot:
- Bastardmod
- ETBlight
- ETNam
- ETPub
- infected
- Jaymod
- legacy (default mod of ET:Legacy)
- N!tmod
- No Quarter
- silEnT mod - cvars
Once you know which mod you are going to use you need to check which version of omnibot runs with that mod & version, you can find this here : Download the correct version of Omnibot
Install Omni-Bot
If you use ET:Legacy, you will find Omni-Bot already installed in the legacy folder. It may be older or newer than version from the Omni-Bot website.
- Download the latest version of Omni-Bot from here
- There is omni-bot folder inside the ZIP archive. Extract it. Omni-Bot can be installed to any location. It is not necessary to have omni-bot inside Enemy Territory folder.
Create config file
Many mods already have a config file (for example jaymod.cfg, silent.cfg, nitmod.cfg). They already have the cvars in them so you just need to edit them. If not you just simply need to add them. If your mod does not have any config file yet, create new file (for example server.cfg) and save it to mod's folder.
The server configs CVAR's you need to add/edit are as follows
Enable Omnibot
To Enable omni-bots add:
set omnibot_enable "1"
A setting of "0" will disable the bots
Set Omnibot Path
Windows
set omnibot_path "C:\Your install folder\omni-bot"
Linux
set omnibot_path "/usr/local/games/enemy-territory/omni-bot"
Be aware Windows uses left-slashes '\' and Linux/UNIX based-systems use right-slashes '/' as separator-char.
The omnibot_path cvar needs to be set to the absolute path of the omni-bot folder. If you are unsure of the absolute path, you will need to ask your server provider.
Optional Flags
This is an optional cvar, you only need to add it if you want to disable certain bot functions.
set omnibot_flags "0"
Add the following flags if required
1 Disable XPSave for bots
2 Bots cannot mount tanks
4 Bots cannot mount emplaced guns
8 Don't count bots (this affects the value of the cvar 'omnibot_playing' which contains the number of bots playing or -1 if this flag is set)
Note: some mods may have other flags
Optional Log Size
Log files are written to folder omni-bot/et/logs. If the folder does not exists, log files are written to Enemy Territory game folder. File name is omnibot_<mapname>.log.
set omnibot_logsize "0"
- Value -1 disables logging.
- Default value 0 enables logging, but files will be overwritten every match.
- Value greater than 0 means maximal file size in KB and also allows appending more matches to a single file.
Run ET
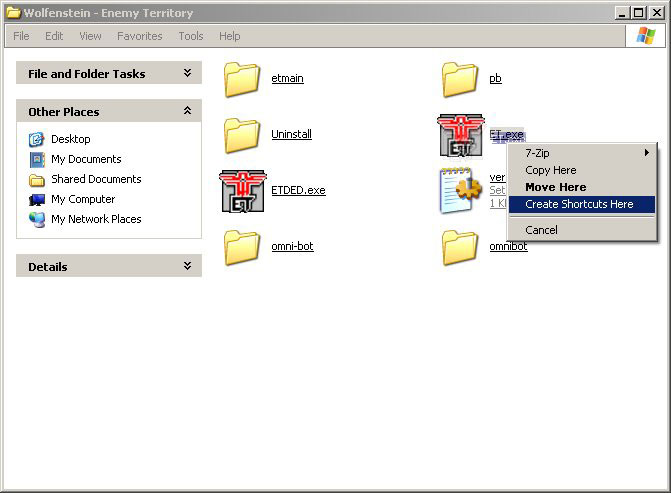
You can start ET from command line, but it's recommended to create a shortcut and put that shortcut to the start menu or desktop.
On local home computer create shortcut to ET.exe or etl.exe in Windows, et or etl in Linux.
On dedicated server use ETDED.exe or etlded.exe in Windows, etded or etlded in Linux.
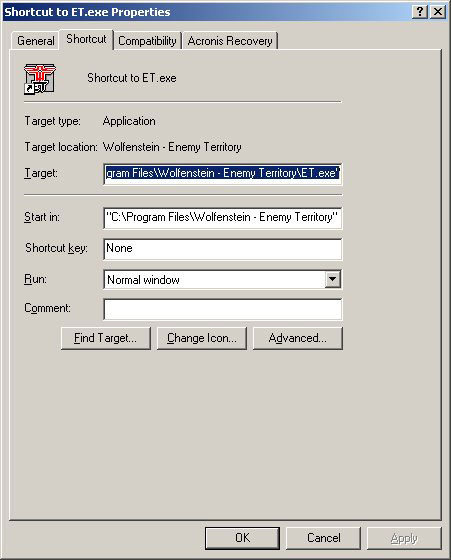
Right click & select properties
Add parameters:
+set fs_game noquarter +set com_hunkmegs 64 +exec server.cfg
Replace the word noquarter with the mod you are using. It must be exactly mod's folder name.
Replace server.cfg with your config file name.
Some very large maps may need greater com_hunkmegs.
Note: If you start ET without fs_game parameter, then you can choose MOD from the menu.
Load map
There are a few ways to load map in ET.
- Click on HOST GAME in the menu and then choose map name from list. See Running_Omni-Bot_Loading_maps_ET for more details.
- Open the game console and type
/map <mapname>
- If you want to enable cheats, you must type
/devmap <mapname>
- Add map <mapname> command to the server config.
Bots will join game automatically during warmup only if you have configured maxbots.
Installation (omnibot mod)
Omnibot mod is required if you want to edit waypoints or map goals. Although console commands work in all mods, OpenGL drawing works only in omnibot mod. If you only want to play ET, you probably choose another mod because omnibot mod does not have any advanced features.
Installation
- Install Omni-Bot, if you have not done it yet
- Download file omni-bot_0_87_ET_waypoint_mod.zip from GitHub. The ZIP file contains both Windows and Linux binaries.
- There is omnibot folder in the ZIP file. Extract it to the ET game root folder. It must be at the same directory level as etmain.
- Create shortcut to ETL.exe +set fs_game omnibot +exec server.cfg
Replace ETL.exe with ET.exe if you don't use ET:Legacy. It's possible to have multiple versions installed. If you renamed omnibot folder, you must replace omnibot after fs_game parameter with your new folder name. - Add omnibot_path, cg_omnibotdrawing and bind commands to server.cfg.
- You need cheats to edit waypoints, therefore you have to use /devmap command to load maps.
Configuration
Number of bots
/bot maxbots 15
Sets maximum number of bots. It must be less than number of slots (sv_maxclients). The server manager script will automatically kick one bot when a human player connects to server and joins axis or allied team. Similarly, it will add a new bot if some player disconnects.
/bot minbots 2
Sets minimum number of bots. Default value is -1. You should set minbots only if you want some bots to be always playing even if your server is full.
If you want to add bots manually, you must set maxbots and minbots to -1. Then you can add bots by commands /bot ab or /bot addbot.
Difficulty levels
/bot difficulty 4
Difficulty ranges from 0 to 6 (0 is easy, 6 is hard).
If you change difficulty, bots' properties will be adjusted (reaction time, field of view, aim error, view distance, ...). Advanced users can adjust bot properties for each difficulty level in the file omni-bot/et/scripts/goals/goal_difficulty.gm.
Combat movement skill
/bot moveskill 4
Moveskill ranges from 0 to 3. Specifying 4 for moveskill will have each bot choose a random moveskill.
It affects bot's behaviour during combat (crouch, strafe left or right, ...).
Balance teams
/bot balanceteams 1
If you enable balanceteams, bots will move between teams in order to keep same number of players in both teams.
Log files
Log files are written to folder omni-bot/et/logs. If the folder does not exists, log files are written to Enemy Territory game folder. File name is omnibot_<mapname>.log.
/seta omnibot_logsize 100
- Default value 0 disables logging.
- Value greater than 0 means maximal file size in KB.
Configuration file
You can find the file omni-bot.cfg in the folder omni-bot/et/user. You usually don't need to modify this file because most settings can be changed from the console. Nevertheless, some advanced settings are not accessible from the console: CountSpectators, SleepBots, SaveConfigChanges, AdjustAim, DumpFileEnable, DumpFileDialog, LiveUpdate, Debug, EnableInterProcess, LogInfo, LogWarnings, LogErrors, LogCriticalErrors.
Documentation can be found in file omni-bot.txt.
Changing bot names
You need to go into the omni-bot/et/scripts folder. In Omni-bot 0.82 or later open file "et_botnames_ext.gm". In Omni-bot 0.81 or 0.8 open file "et_botnames.gm". In Omni-bot 0.71 or older open file "et_autoexec.gm". Bots' names are in quotes. Do not change other commands in that scripts.
Waypoints folder
Waypoints and map scripts can be found in the omni-bot/et/nav and omni-bot/et/incomplete_navs folders. New waypoints should be added into this folder. You can add new waypoints in a zip or 7z file (they must be at the root level of the zip file, not in a folder) or you can just add the files directly.
Waypointing
Waypointing in ET
Note that waypointing works only in omnibot mod on your own computer. It does not work in NQ, Jaymod, etc. and it will not work on a dedicated server.
Before you do start to waypoint a map you might what to open a map that has already been waypointed like the any of the 6 standard maps. This will give you an overview of how a waypointed map should look like.
Disable the time limit of the map or set it to something very high if possible. In ET, use the command /ref timelimit 0 to have unlimited time on a map. If a map restarts while you are editing waypoints, your unsaved changes will be lost.
Join a team, Its best to join as an engineer because then you can dynamite obstacles out of your own way, build bridges etc.
Start waypointing
Wait until the warmup finishes, and the map starts.
If you don't want to wait, you can add this to your config:
seta g_warmup "1"
Note: warmup can't be less than 10 seconds in Omni-Bot 0.83 or older.
1st make sure cg_omnibotdrawing is set to "1"
you can do this in console by just typing
/cg_omnibotdrawing
If this is "0" you can either open the console and type
/set cg_omnibotdrawing 1
Or you can add this to your config
seta cg_omnibotdrawing "1"
2nd you need to see the waypoints so open the console and type
/bot waypoint_view on
You can adjust visibility distance
/set omnibot_render_distance 2000
Do not set omnibot_render_distance value too big because game has limit how many lines can be visible concurrently.
Now you can add your 1st waypoint, in console type
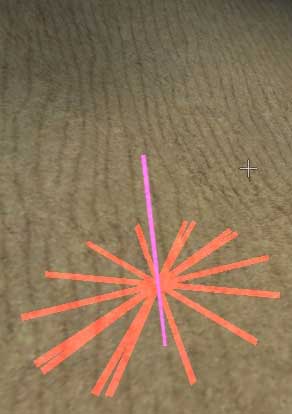
/bot waypoint_add
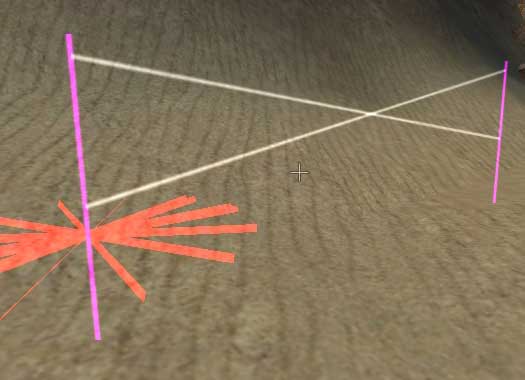
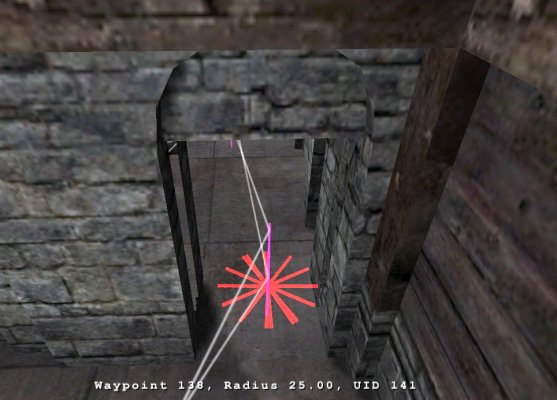
You should now see this
The vertical purple line is the actual waypoint, The red star shaped "beams" indicate the radius size of the waypoint.
Now move away from your 1st waypoint.
Make sure that there are no objects or anything to block your path between your 1st waypoint and where your player is.
Now add your 2nd waypoint
/bot waypoint_add
You should now have something like this
The next step is to join the 2 waypoints
There are 2 ways you can join waypoints the 1st is a one-way connection (/bot waypoint_connect) and the 2nd is a two-way connection (/bot waypoint_biconnect).
The general rule is to always use the two-way connection unless it is only possible for the bot to go one-way i.e. when dropping down from a ledge.
Now lets join the 2 waypoints up.
To join up 2 waypoints you need to use the following command on each of the 2 waypoints you want to connect
/bot waypoint_biconnect
You should now have something like this
Note on this picture that there are 2 lines connecting the waypoints.
You are not limited to adding 1 connection per waypoint just add a 3rd waypoint and connect the waypoints in the same way you have just learnt.
Now starting from your last waypoint you made move your player to an objective adding more waypoints and connecting them as you go.
Video Tutorial Version
|
Adding & Bi-Connecting Waypoints
|
Saving Your Waypoints
Save often. Although the bot is pretty stable, it is a good habit to save often.
To save you waypoints use this command
/bot waypoint_save
Note If the time runs out on the map you will lose all your work when the maps restarts unless you have used the above command.
Correcting your mistakes
You are 'Human' not a 'Bot' so you will make mistakes.
If you just want to remove the connections between 2 waypoints use the /bot waypoint_biconnect or /bot waypoint_connect (depending on the type of connection) on both the waypoints you want to remove connections from.
To move a waypoint because its in the wrong place you need to go to the waypoint and use this command
/bot waypoint_move
Then move your player to where you want new waypoint to be and use the same command again. Any waypoints you have connected will stay connected this way
In some cases you will want to delete the waypoint & its connections to do that use this command
/bot waypoint_del
Video Tutorial Version
|
Moving & Deleting Waypoints
|
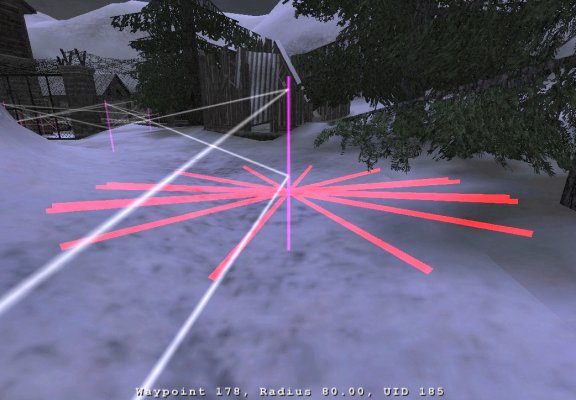
When you are waypointing a map you will sometimes need to change the waypoint radius, The size of the radius is visualized by the red star shaped "beams" at the bottom of the waypoint.
A waypoint's radius is the tolerance for moving towards a waypoint. If you want the bots to get very close to a certain spot, use a smaller radius, if it doesn't matter much if a bot reaches this specific waypoint exactly, you use a large radius.
The default radius is 35 game units this will do in most cases, but some situations require some radius tweaking. In areas where there is plenty of space, a larger radius will make it easier for the bots to avoid running into each other when they meet on a waypoint, so a radius of 60, 80, or even 100 will be a better choice:
To Change a single waypoint's radius to 80 for example you would use this command
/bot waypoint_setradius 80
If you want to use a different default size radius other then the standard size of 35, for example 60 you would need use this command
/bot waypoint_setdefaultradius 60
Don't use radius values of less than 10 or so.
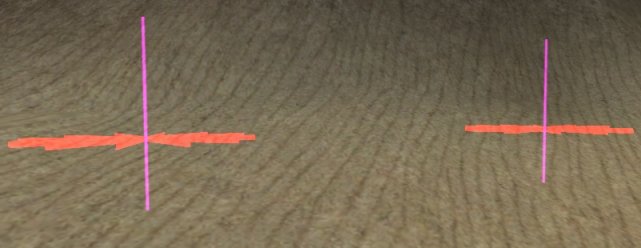
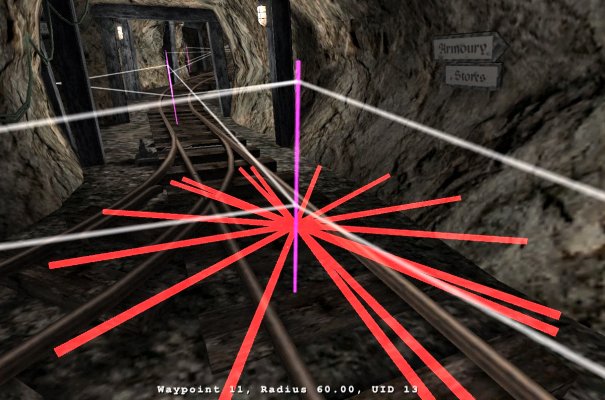
In tight areas, in particular at doors and ladders, use a smaller radius, but normally not much smaller than 20. Make sure that the red "beams" that visualize the radius do not hit walls or other objects:
Movement Flags
This section introduces 'flags'.
A flag is an instruction added to a waypoint telling a bot to do something. You can add more then 1 flag to each waypoint.
The command is:
/bot waypoint_addflag <flag>
There are many flags you can add to waypoints but for now we are just going to look at flags that are relevant to the bots movement.
Jumping
The flag that you are going to use the most is probably the 'jump' flag as bots do not know when they need to jump to get over/onto stairs or a small wall.
There are 3 types for jump flags and you need to decide which one is the best to use for the bot to continue on its way
jump
- This Flag causes the bot to jump.
jumpgap
- This Flag causes the bot to check the ground ahead and jump near before gaps in the ground.
jumplow
- This Flag causes the bot to check a short distance in front of the bot and jump over low obstacles such as small walls, crates, boxes...
Depending on which flag you think best suits the area of the map use one of the following commands:
/bot waypoint_addflag jump
/bot waypoint_addflag jumpgap
/bot waypoint_addflag jumplow
If you find that the jump command you have used does not work very well you can move the waypoint closer/further away or add the same flag command again to remove it, then try one of the other jump flags.
Sprint
The next flag we are going to look at is the 'sprint' flag, this simply makes the bot sprint (run). The sprint flag is a good example of when you can add a 2nd flag to a waypoint, as you know if you jump while sprinting in the game you can just jump a little bit further so you could use both the jump & the sprint flag together. To add the sprint flag you use this command.
/bot waypoint_addflag sprint
Sneak (Walk)
The 'sneak' (walk) flag, this is best used when there is a danger of a bot falling down somewhere if it moves at normal speed, you may also find other instances where this would be useful. To add this flag use.
/bot waypoint_addflag sneak
Prone & Crouch
The 'prone' & 'crouch' flags should be used when it is not possible for a bot to get through an area when in the normal standing position. The commands to add these are.
/bot waypoint_addflag crouch
/bot waypoint_addflag prone
Video Tutorial Version
|
Movement Flags
|
Doors
This section is about doors.
There are 2 types of doors normal (for both teams) & team only.
Normal doors
Approach the door and place a waypoint where you would normally use the activate key to open it.
Now add the following command (flag)
/bot waypoint_flag door
Now you need to do exactly the same on the other side of the door and connect up the 2 waypoints.
Team only doors
Team doors are waypointed in the same way as normal doors and still require the door flag.
Because it is a team only door, another waypoint flag needs to be added.
There are 2 commands to choose from as there are 2 teams in ET axis (team1) & allies (team2).
Depending on which team the door belongs to add 1 of these commands
/bot waypoint_flag axis
/bot waypoint_flag allies
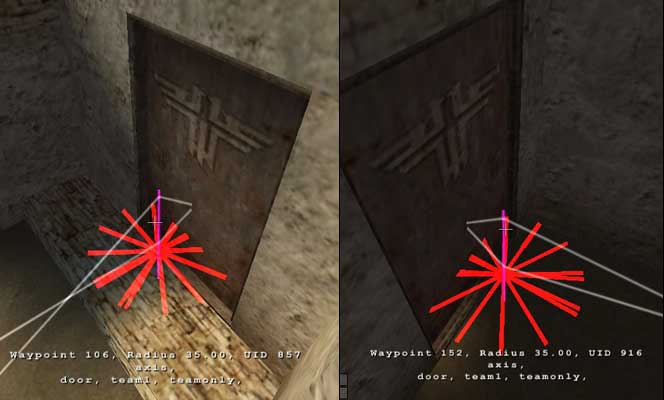
It is sufficient to add axis/allies flag only to that waypoint which is inside building. It should not be added to waypoint which is outside because it can be accessed by players from both teams.
Picture below is an example of a "team only" door
If you want disguised covertops to go through enemy doors, you must add infiltrator flag
/bot waypoint_flag infiltrator
Note: previous Omni-bot versions used disguise flag which required 2 paths through door. The first path had axis/allies flag and the second path had the disguise flag.
Video Tutorial Version
|
Adding & Bi-Connecting Waypoints
|
Ladders
For bots to be able to go up & down ladders you need to use the 'climb' flag.
Short ladders
It's easy to create waypoints for short ladders.
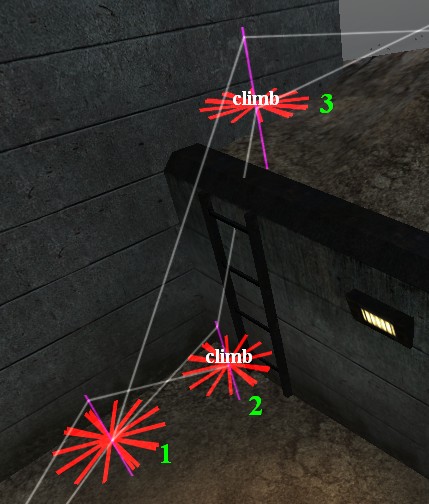
Have a look at this picture for an example
Add two-way connection between waypoints 1 and 2.
Add one-way connection from waypoint 2 to waypoint 3. Bots will use it to climb up.
Add one-way connection from waypoint 3 to waypoint 1. Bots will use it to jump down.
Add "climb" flag to waypoints 2 and 3.
/bot waypoint_addflag climb
Change the radius of waypoints 2 and 3 to match the size of the ladder.
/bot waypoint_setradius 20
Long ladders
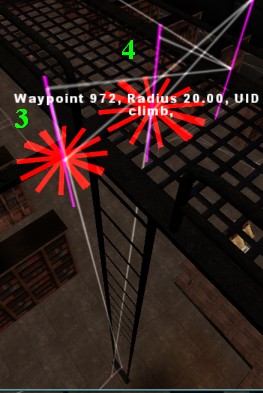
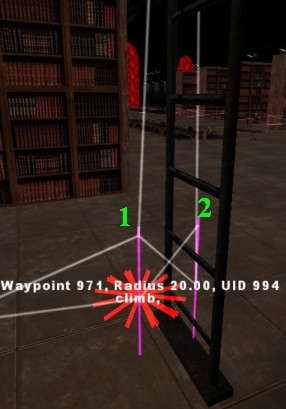
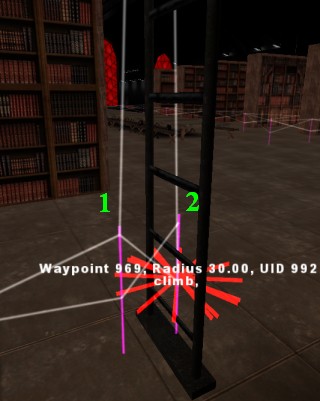
It's hard to create waypoints for long ladders because you need to position the waypoints correctly.
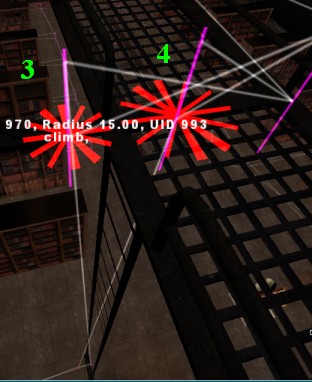
Have a look at these pictures for an example
Waypoint 1 is just before the base of the ladder.
Waypoint 2 is "inside" the ladder. You must have cheats enabled so that you can use /noclip command.
Waypoint 3 is exactly at the top edge. You can use /noclip command and move it slightly away from ladder. But if you move it too far, bot will fall down to death.
Waypoint 4 is at the top just after you have exited off the ladder.
Create one-way connection from waypoint 1 to waypoint 4.
Create one-way connection from waypoint 3 to waypoint 2.
Create two-way connection between waypoints 1 and 2.
Create two-way connection between waypoints 3 and 4.
Add "climb" flag to all four waypoints.
Waypoint 1 should have small radius. Otherwise bots would look up and wait 1 second before they start to climb up.
Waypoint 2 should have bigger radius. Otherwise bots would abort their goal after they climbed down.
Waypoint 3 should have small radius. Otherwise bots would stuck and kill themselves when they want to climb down.
Walls
The old wall in the oasis map is an example of a blockable section that can be unblocked once the wall has been blown.
Because bots do not see walls you need to add a flag that will detect if a bot can use the path between the 2 waypoints.
The flag you need to add is the 'blockwall' flag, this need to be added to both waypoints.
/bot waypoint_addflag blockwall
Once you have added the 2 waypoints you will see a green line if the connection is not blocked & a red line if it is blocked.
If you don't see a red/green line save your waypoints and it should appear
|
Waypointing Walls
|
Vehicles
The 'blockwall' flag is also used for tanks, trucks and any other moveable object in a map.
All waypoint connections which cross the road need to be seen by the bots as blockable or they will just walk into vehicle and become stuck.
You need to place waypoints only at the side of the vehicle. Don't place any waypoints where they would be potentially covered by the vehicle.
Don't place waypoints too close to the vehicle. There should be enough space so that bots would not stuck.
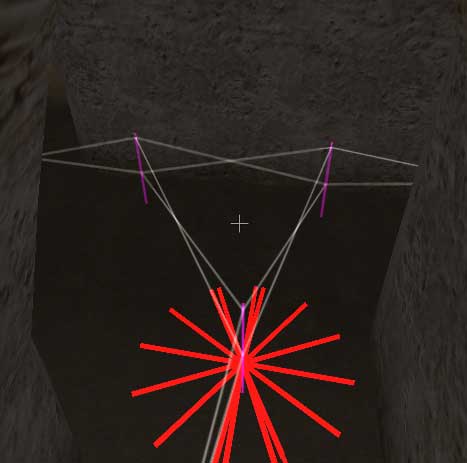
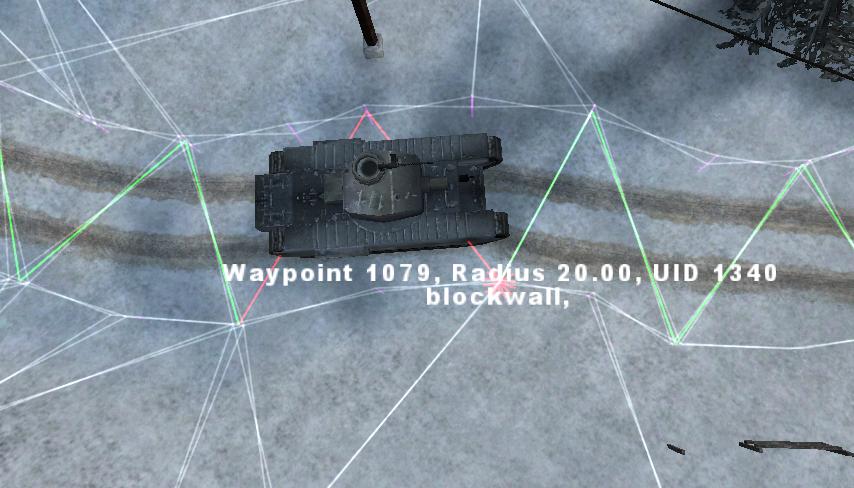
Create paths on at least one side of the vehicle for the entire route. It is recommended to create paths on both sides of the vehicle as shown here:
Usage of the blockwall flag is necessary wherever the tank may cross over any connections. In the picture, the red lines mark the connections currently blocked by the tank.
Try not to create too many blockable connections because it would increase CPU usage. All blockable connections are tested every 2 seconds by TraceLine function that is slow. Connections at both sides of vehicle should not be blockable because they can never be crossed by the vehicle. You can use command /bot waypoint_split to change a blockable connection to two normal connections.
Water
The 2 tunnels in Oasis are a good example where you only want the bots to go though if the water has drained.
You need to use the 'blockwater' flag here.
/bot waypoint_addflag blockwater
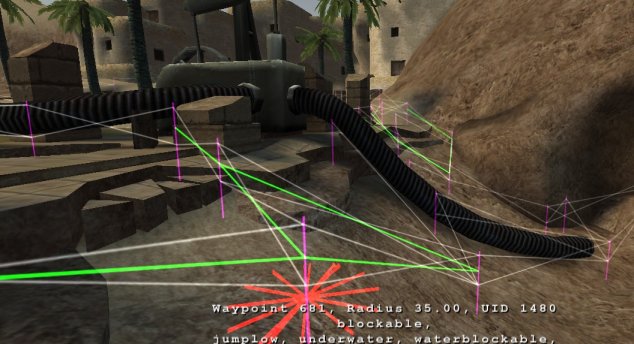
You can see in this picture that there are a few green lines this is because there is more then just the 1 entry into the tunnels.
You can also see that in the main part of the tunnel no flags have been added, you only need to add the flags to the entry/exit waypoints.
Bridges
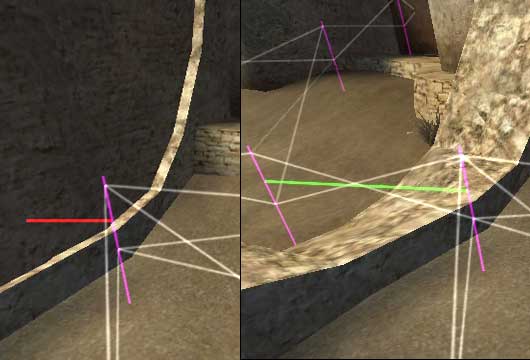
On various maps you need to build bridges to get across a gap. On these bridges you need to add the 'blockbridge ' flag or the bots will try to use the waypoints even when the bridge is not there.
The check for blockbridge is basically a probe to see if there is a surface detected under the link between the waypoints. When there is no bridge built, the probe doesn't detect the surface, and results in a blocked path. When the bridge is built, the surface is detected, and the link is opened.
To add the blockbridge flag use:
/bot waypoint_addflag blockbridge
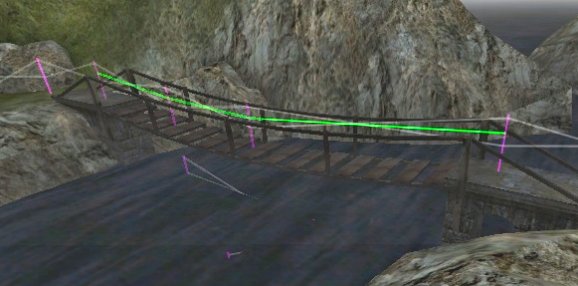
An example of blockbridge (taken from the Bergen map):
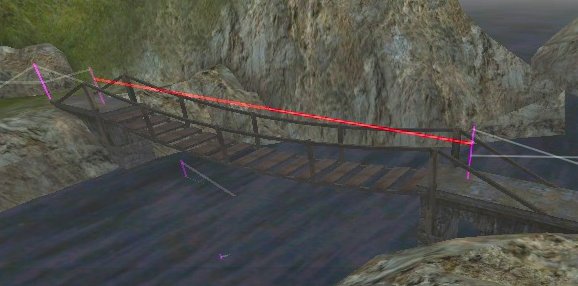
Due to this method of detecting the blocked status of a path across a bridge, rope bridges and similar constructions with a slightly curved shape may require three or more waypoints, all of which should have blockbridge flags. Otherwise, the detection of a surface beneath the path might fail, as can be seen in this screenshot:
Testing & fixing
Reference
Goals
Bot's behaviour is controlled by states. Most of low-level states are written in C++ and they are compiled into dynamic link library. For example FollowPath, Aimer, LookAround, WeaponSystem, TargetingSystem, SensoryMemory. You can view them in the Debug Window. Most of high-level states are written in GameMonkey and we call them ScriptGoals. You can find them in omni-bot/et/scripts/goals folder or omni-bot/global_scripts/goals folder. You usually don't need to modify ScriptGoals.
Following tutorial is about MapGoals which are specific for each map. MapGoals are locations in the map that represent something for the bot to do. They are saved into omni-bot/et/nav folder and have _goals.gm suffix. Don't open goals files in text editor. They are automatically generated by command /bot goal_save. There is usually 1:1 relationship between ScriptGoal and MapGoal types, but there are a few exceptions. For example ScriptGoal CAMP can handle multiple MapGoals CAMP, ATTACK, DEFEND, SNIPE. Some ScriptGoals don't need any MapGoal because they are activated by game events. For example WatchForProjectile, InDisguise, DeliverSupplies, PickupItems.
Reference
Creating your first goal
- stand in a location where you want a camp goal. this does not have to be on a waypoint, in fact it is better if it is not directly on a waypoint.
- /bot goal_create camp test1
- face a direction you would like the bot to face
- /bot goal_setproperty facing 0
- optionally face another direction and add another facing with /bot goal_setproperty facing 1
- /bot goal_setproperty stance crouch
- note that the rendering for the aim vectors gets lowered depending on stance. prone would render much lower for example
- /bot goal_finish
- this deselects the goal
- /bot goal_save will save all the goals to the nav folder in <mapname>_goals.gm
Editing an existing goal
- /bot draw_goals on if not already rendering
- stand next to a goal
- /bot goal_edit
- this selects the goal and should be indicated in console
- /bot goal_move
- this will start moving the goal based on where you are aiming
- /bot goal_move
- this will stop moving the goal
- /bot goal_setproperty facing 2
- add another facing so the bots will scan an area
- /bot goal_finish
Auto Detected Goals
These goals are created automatically by the mod:
- AMMOCAB
- BUILD
- CHECKPOINT
- DEFUSE
- HEALTHCAB
- FLAG
- FLAGRETURN
- MOUNTMG42
- MOVER
- PLANT
- REPAIRMG42
- REVIVE
In most cases, the goal have all the information it needs without further input, and can operate correctly. Some goals have additional options that are specific to that goal type. For example, you can define cover spots at PLANT goal. You can use command goal_help to list all properties and you can change properties by command goal_setproperty.
Scripting
All scripts in Omni-bot are GameMonkey scripts. First of all you should read GameMonkeyScriptReference.pdf.
- Creating a script
- Debugging tips
- Triggers
- Goals: Availability, Priority, Camp times, Max users, Range, Roles, Use points
- Paththrough: Navigation, RideMovers, UseSwitch
- Trigger regions, Pre-Scripted Regions
- Changing spawns
- Bots shooting map objects
- Scripting waypoints flags
- Talking bots
- Sniper and Panzer maps
|
Global Script Functions
|
Scripting Types
|
Constants
|
Routing
Routing Overview
Until version 0.65, omni-bot path selection relied on the shortest path to a goal. While this typically provided for very focused attacks, game play became very predictable. The solution is Routing. Routing provides alternate goals for the bots to go to before heading to their main goal. When positioned correctly, these alternate goals provide the effect of bots choosing realistic and varied paths to their main goals.
Routing requires some setup in script and in the waypoints, but the results are worth the effort. The objective of this article is to provide an overview of how the routing system works and to clearly define how to set it up by walking through a working example on Goldrush.
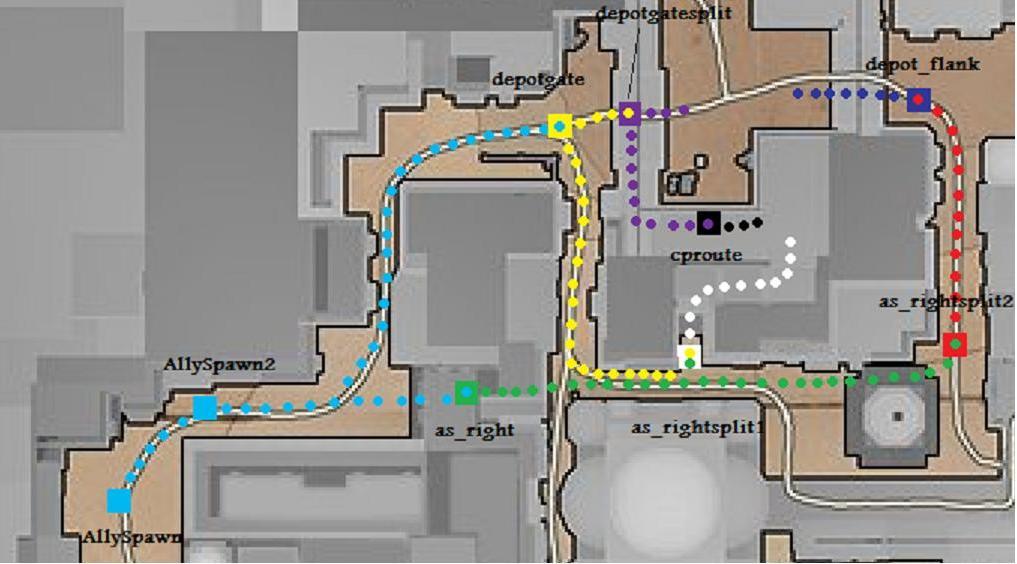
In this picture, Squares are route nodes and the Dots are potential paths. The color of the Dots correspond to the color of the Route nodes. Once they reach a route node, they will travel along the path(s) of the same color IF the route node is set up for their current main goal.
Walking through the picture, let’s say the tank construction goal is set up for an allied engineer within the AllySpawn route nodes, and that the engineer has the tank construct as its goal. The engineer will randomly choose whether to go to the green route node (as_right) or the yellow route node (depotgate). For the purpose of this example, let’s say the bot chose to go to the green route node. From there, he will randomly choose to go to the white or red route node. The bot will continue to make these decisions until there are no route nodes left to go to. From that point, the bot will take the shortest path to the tank construct goal.
As you can see, this opens up several different points of attack for the bots; which creates a sense of realism in terms of predictability. Defenses will now need to be set up to be able to react to all of the entry points rather than focusing on easily predicted choke points if the shortest path is always used.
Setting It Up
Setting up Routes involves waypointing and scripting. This section will take you step by step through the process of setting up the routes in the Goldrush example.
Step 1: Setting up the script
The first requirement for routing is that the routes are defined in the map script. The method to do this consists of building a table for the routes and calling a utility function that will register the routes.
If a map script does not exist yet, open up your favorite text editor and add the following to a new file:
 global InitializeRoutes = function()
 {
 };
Save the file as <mapname>.gm in your Omni-Bot\et\nav folder. You are now ready to start building the routes. Inside the InitializeRoutes function is where the route definitions are placed and they all start with a basic layout:
 global InitializeRoutes = function()
 {
     MapRoutes =
     {
     };

     Util.Routes(MapRoutes);
 };
You now have a MapRoutes table defined and are registering everything within that table with the Util.Routes function.
Step 2: Adding route goal
Route goals are fairly straight forward. They have two important properties; route name and radius. You can use any name you want for the route nodes, but they should be somewhat intuitive. To see the full guide on adding route goals see the Route_Goal page.
Route goals are placed in positions where a bot might receive the goal you want them to use alternate paths for. The bot MUST be inside the route node radius when receiving a goal for it to work. Spawn points are good spots for route nodes because bots always receive a goal when they spawn.
In the spawns area you need to place the goal over the spawn positions and give it a large radius to cover the spawn points. Issue the following commands in console:
 /bot show_spawns
 /bot goal_create route AllySpawn
 /bot goal_setproperty radius 500
The radius of the route nodes at spawn positions are very critical because the bots must be inside its radius for it to work. Be sure that the radius covers the entire spawn area. Bots do not always receive goals immediately at spawn. Sometimes they receive goals 2 seconds after spawn. That's why it's always better to set bigger radius. But be careful, route nodes must not overlap.
For routing to be effective, you will need at least two defined because once they reach the route node, they will take the shortest path to their goal UNLESS there is another route node set up for them to go to. Continuing with our example, create a route node where the green square is in the picture and name it as_right:
/bot goal_create route as_right
You now have two route nodes; meeting the requirement for working routes. In our example, we want the bots to use two paths from the spawn, so add the route node depicted by the yellow square at the depot gate:
/bot goal_create route depotgate
Be sure to save the goals at this point. The next step is to set up the goals and route node selection in the script.
/bot goal_save
Step 3: Scripting the routes
The Maproutes table is set up with the following format:
  MapRoutes =
  {
      GOALNAME1 =
      {
          ROUTE_NAME = {},
      },
      GOALNAME2 =
      {
          ROUTE_NAME = {},
      },
  };
  MapRoutes["GOALNAME3.*"] =
  {
      ROUTE_NAME = {},
  };
  MapRoutes["GOALNAME4.*"] =
  {
      ROUTE_NAME = {},
  };
If you are new to map scripting, this may appear a bit intimidating. The key is to follow the steps and syntax exactly, then let the understanding of the syntax come naturally. If you are comfortable with gm scripting, the routing set up consists of nested tables.
"GOALNAME3.*" is a regular expression which matches multiple goals. It is usually used for ATTACK and DEFEND goals. For example, regular expression "ATTACK_Depot.*" matches goals ATTACK_Depot1, ATTACK_Depot2, ATTACK_Depot3, etc. Regular expression "ATTACK_Depot[25]" matches goals ATTACK_Depot2 and ATTACK_Depot5. Routes for regular expressions have special syntax and they must be defined after the initial MapRoutes table.
The goal names and route names must match the output from command /bot show_goals. Be sure to double check the goal names. Route names are case sensitive.
For the Goldrush example, set up the tank construct routing as follows:
 global InitializeRoutes = function()
 {
 	MapRoutes =
 	{
 		BUILD_tank =
 		{
 			ROUTE_AllySpawn = {},
 		},
 	};

 	Util.Routes(MapRoutes);
 };
The AllySpawn route node is now a valid route node for the tank construct goal. If a bot spawns within its radius and receives the tank construct as a goal, it will use that route node. In and of itself, this route node will not do anything because at spawn the bot is already at it. So let’s add the two path options we want to give the bots from the Allied Spawn:
global InitializeRoutes = function()
{
    MapRoutes =
    {
        BUILD_tank =
        {
            ROUTE_AllySpawn =
            {
                ROUTE_as_right = {},
                ROUTE_depotgate = {},
            },
        },
    };

    Util.Routes(MapRoutes);
};
It’s important to understand what we just did with this:
 ROUTE_AllySpawn =
 {
     ROUTE_as_right = {},
     ROUTE_depotgate = {},
 },
The bot reaches the AllySpawn route node by default when it spawns; and because we have added the two routes inside the brackets, the bots will randomly choose between them. At this point, you have randomized routes for Allied engineers with the tank construct goal. Half the time they will choose to go to route as_right and half the time they will choose to go to route depotgate.
Let’s make them even less predictable. Looking at the example picture, you can see that we want them to have a couple different options once they reach the route nodes we just set up. Repeating step 2, add the rest of the route nodes depicted by the colored squares.
The scripting for the path options in the picture is as follows:
 global InitializeRoutes = function()
 {
     MapRoutes =
     {
         BUILD_tank =
         {
             ROUTE_AllySpawn =
             {
                 ROUTE_as_right =
                 {
                     ROUTE_as_rightsplit1 = {},
                     ROUTE_as_rightsplit2 =
                     {
                         ROUTE_depotflank = {},
                     },
                 },
                 ROUTE_depotgate =
                 {
                     ROUTE_cproute = {},
                     ROUTE_depotgatesplit = {},
                     ROUTE_as_rightsplit1 = {},
                 },
             },
         },
     };

     Util.Routes(Maproutes);
 };
Step 4: Testing the routes
Testing the routes is by far the most important step. It is recommended that you test routes individually as you start to learn the routing system. Once you are comfortable with the setup, you may want to add routes for an entire phase and then test them to make the process a bit faster.
If the routing is not working as expected, there are some basic troubleshooting options. It’s important to remember the criteria for the routes; the bot must be within the radius of the route node when receiving the goal, and the route node must be set up to support the goal. The basic troubleshooting steps are:
- Check in console when the map loads for any error messages. It should list any goal names not found when initializing the routes.
- Check the radius of the route where the bot receives the goal
- Make sure the bot can reach the goal
- Make sure the bot is getting the expected goal
For numbers 2 and 3, consider using the command /bot debugbot all goals with only one bot connected. In console, it should give success / failure messages for short term and long term goals. An example of a known problem is if there are priority type goals (like radar parts stealing) that are active when they aren’t reachable. The solution is to set them to be not active in OnMapLoad if they are unreachable.
Step 5: Adding priorities to routes
In some cases, you may want bots to use a certain route more often than others. This can be done by adding a “weight” to the route table:
 ROUTE_as_right =
 {
     Weight = 2,
     ROUTE_as_rightsplit1 = {},
     ROUTE_as_rightsplit2 =
     {
 	  Weight = 2,
 	  ROUTE_depotflank = {},
     },
 },
In this example, the bots will randomly choose to go to route as_right twice as much as route depotgate. And then they will choose to go to route as_rightsplit2 twice as much as route as_rightsplit1.
Step 6: Copying routes
If you have more than one goal that you want to share the same routing with, you can copy the routing. In the Goldrush example, say we have some attack goals in the yard that we want to route to. Rather than writing out the tables for each attack goal, we can copy them like this:
 MapRoutes["ATTACK_Depot_.*"] = MapRoutes.BUILD_tank;
 MapRoutes.MOUNT_tank = MapRoutes.BUILD_Tank;
The key point to remember when doing this is that the route table that exists must be on the right side of the equation. In this case, we have created routes for multiple attack goals and a mount goal that are the same as our example routing to build the tank.
These should be placed in InitializeRoutes as well, below the Maproutes table and above the Util function that registers the routes:
 global InitializeRoutes = function()
 {
     MapRoutes =
     {
         BUILD_Tank =
         {

         },
     };

     MapRoutes["ATTACK_Depot_.*"] = MapRoutes.BUILD_tank;
     MapRoutes.MOUNT_tank = MapRoutes.BUILD_Tank;

     Util.Routes(MapRoutes);
 };
You can also store shared routes to a local variable and then use it for several goals:
	r = {
		ROUTE_city1 = {},
		ROUTE_city2 = {},
		ROUTE_city3 = {},
	};
	MapRoutes =
	{
		FLAG_Gold_Bars =
		{
			ROUTE_spawn = r
		},
		CAPPOINT_gold =
		{
			ROUTE_gold = r
		},
	};
If there are shared routes within one goal, then don't copy them. Just define them once:
	MapRoutes =
	{
		PLANT_Gun =
		{
			ROUTE_spawn =
			{
				ROUTE_door =
				{
					ROUTE_hatch =
					{
						ROUTE_eastdoor = {},
						ROUTE_westdoor = {},
					},
					ROUTE_stairs =
					{
						ROUTE_westladder = {},
						ROUTE_eastladder = {},
					},
				},
				ROUTE_radar =
				{
					ROUTE_hatch = {},
					ROUTE_stairs = {},
				},
			},
		},
	};
If a bot chooses path ROUTE_spawn -> ROUTE_radar -> ROUTE_hatch, then he will continue to ROUTE_eastdoor or ROUTE_westdoor.
Step 7: Toggling routes
Routes are treated very similar to map goals. They will show up in your list if you do a /bot show_goals. They can be turned on and off via scripting with the SetAvailableMapGoals function. As an example, say we have route that we want opened up when barrier is destroyed, then closed when that barrier is constructed. This can be done inside the OnTriggers for those events:
  Barrier_construct = function ()
  {
  	Util.DisableGoal( "ROUTE_routname" );
  };

  Barrier_destroyed = function ()
  {
  	Util.EnableGoal( "ROUTE_routname" );
  };
Step 8: Route maker
- Windows users can use the route maker tool to easily create the MapRoutes table.
- Download it from http://svn.assembla.com/svn/omnibot/Enemy-Territory/0.8/tools/route_tool/
- Extract both RouteMaker.zip and RouteMaker2.zip into the same folder.
- Run RouteMaker2.exe
- You must set rcon password on your Enemy Territory or RTCW server.
- Then use menu command File / Load From RCON
- Drag & drop goals from left panel into middle panel.
- Drag & drop routes from right panel into middle panel.
- Double-click to delete routes.
- Finally use menu command Write / Script
- Output script will be copied to the clipboard. Paste it into the InitializeRoutes function in your map gm script.
Step 9: Ask for help
If you are having trouble with the syntax, set up, or understanding the routing system, ask for help. This guide is by no means comprehensive and complex maps will offer different challenges. Please post in the forums if you have questions / problems / bug reports.
<headertabs />
